WireGuard 部署与使用
介绍
WireGuard 是一个易于配置、快速且安全的开源 VPN,它利用了最新的加密技术。
目的是提供一种更快、更简单、更精简的通用 VPN,它可以轻松地在树莓派这类低端设备到高端服务器上部署。
本文基于 Centos 7.9 编写。
机器初始化
# 关闭 selinux
setenforce 0 && sed -i 's/SELINUX=.*/SELINUX=disabled/g' /etc/selinux/config

# 调整文件描述符大小
echo "* - nofile 65535" >> /etc/security/limits.conf
echo "* - nproc 65536" >> /etc/security/limits.conf
sed -i 's#4096#65536#g' /etc/security/limits.d/20-nproc.conf

cat >> /etc/security/limits.d/nofile.conf <<EOF
* soft nofile 65536
* hard nofile 65536
EOF

# 设置时间同步
(crontab -l;echo '*/30 * * * * /usr/sbin/ntpdate ntp1.aliyun.com && /usr/sbin/hwclock -w') | crontab

# 优化系统内核参数
cat >> /etc/sysctl.conf <<EOF
net.ipv4.ip_local_port_range = 1024 65535
net.ipv4.tcp_syncookies = 1
net.ipv4.tcp_max_syn_backlog = 20480
net.ipv4.tcp_synack_retries = 2
net.ipv4.tcp_syn_retries = 2
net.core.somaxconn = 655350
net.ipv4.tcp_tw_reuse = 1
net.ipv4.tcp_fin_timeout = 30
net.ipv4.tcp_max_tw_buckets = 10240
net.ipv4.ip_forward = 1
net.ipv4.tcp_tw_recycle = 0
net.ipv4.neigh.default.gc_thresh1 = 1024
net.ipv4.neigh.default.gc_thresh1 = 2048
net.ipv4.neigh.default.gc_thresh1 = 4096
vm.swappiness = 0
vm.overcommit_memory = 1
vm.panic_on_oom = 0
fs.inotify.max_user_instances = 8192
fs.inotify.max_user_watches = 1048576
fs.file-max = 52706963
fs.nr_open = 52706963
net.ipv6.conf.all.disable_ipv6 = 1
EOF

sysctl -p >/dev/null 2>&1

# 修改 yum 源地址
sed -e 's|^mirrorlist=|#mirrorlist=|g' \
         -e 's|^#baseurl=http://mirror.centos.org|baseurl=https://mirrors.tuna.tsinghua.edu.cn|g' \
         -i.bak \
         /etc/yum.repos.d/CentOS-*.repo

yum clean all && yum makecache

# 更新(可选)
yum update -y

# 重启机器
init 6
部署服务端
安装
yum install epel-release elrepo-release -y
yum install yum-plugin-elrepo -y
yum install kmod-wireguard wireguard-tools -y
配置
# 进入目录,不存在请手动创建
cd /etc/wireguard

# 创建服务端密钥对
wg genkey | tee privatekey-server | wg pubkey > publickey-server

# 创建客户端密钥对
wg genkey | tee Zhaomimi-client | wg pubkey > Zhaomimi-publickey-client

# 配置服务端配置文件
vim /etc/wireguard/wg0.conf
[Interface]
# 这里指的是使用 172.172.0.1,网段大小是 24 位,不要与原有的冲突
Address = 172.172.0.1/24
SaveConfig = true
# 监听的 UDP 端口
ListenPort = 3367
# 这里填写 privatekey-server 的内容
PrivateKey = UHon4NzonBaSajdajdjsahdadj3TuyXcBYnesVLNjBtWA=

# Client,可以有很多 Peer
[Peer]
# 这里填写 Zhaomimi-publickey-client 的内容
PublicKey = ou0RUhzq21uefewfwefwf2WGAIbaEIOnPluCY2Oy8=
# 这个是 Peer IP 地址,这里是 172.172.0.2/32
AllowedIPs = 172.172.0.2/32
# 如果想把所有流量都通过服务器的话,这样配置:
# AllowedIPs = 0.0.0.0/0, ::/0

# 配置虚拟网卡
vim /etc/sysconfig/network-scripts/ifcfg-wg0
DEVICE=wg0
TYPE=wireguard
IPADDR=172.172.0.1
NETMASK=255.255.255.0
ONBOOT=yes
NAME=wg0
ZONE=public

# 配置防火墙
firewall-cmd --add-masquerade --zone=public --permanent
firewall-cmd --reload

# 启动服务端
wg-quick up wg0

# 常用命令
# 停止服务端
wg-quick down wg0

# 查看节点列表
wg show
Windows 客户端使用
编写客户端配置文件
# 为方便,我在服务端上编写好客户端配置文件
vim Zhaomimi.conf
[Interface]
# 这里填写 Zhaomimi-client 的内容
PrivateKey = bxiIs0czP8fdfdfsfsSldqCIjqI5hMp3LmAY=
# 客户端虚拟 IP
Address = 172.172.0.2/32
# 配置 DNS 地址
DNS = 114.114.114.114
MTU = 1500

[Peer]
# 这里填写 publickey-server 的内容
PublicKey = JmWXpm2TUTsdnaklcnjbncqJXOWsslDK2n6Xw/8hM=
# 服务端公网暴露地址,3367 是上面指定的 UDP,这里做演示,就不做外网端口映射了
Endpoint = 192.168.0.105:3367
# 指定要访问的服务端网段,或者设置0.0.0.0/0来进行全局代理
# 我这里配置访问 172.172.0.0/24 和 192.168.0.0/23 的流量走虚拟网关,按需修改
AllowedIPs = 172.172.0.1/24,192.168.0.0/23
# 配置 Keepalive
PersistentKeepalive = 25
安装 WireGuard 客户端
安装
下载地址:GitHub - WireGuard

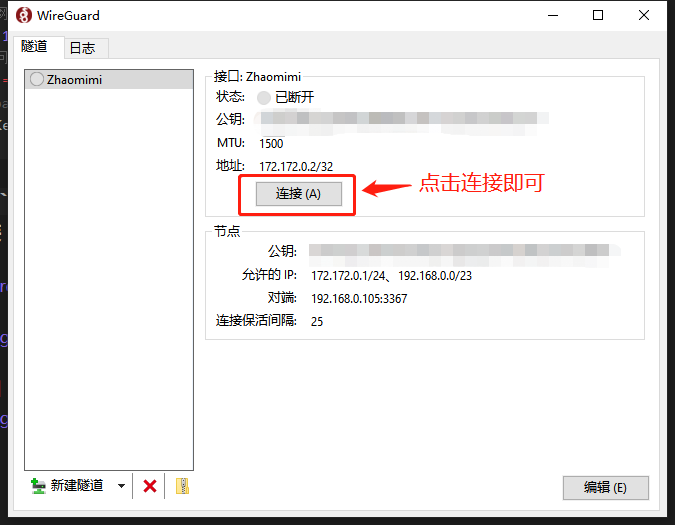
使用


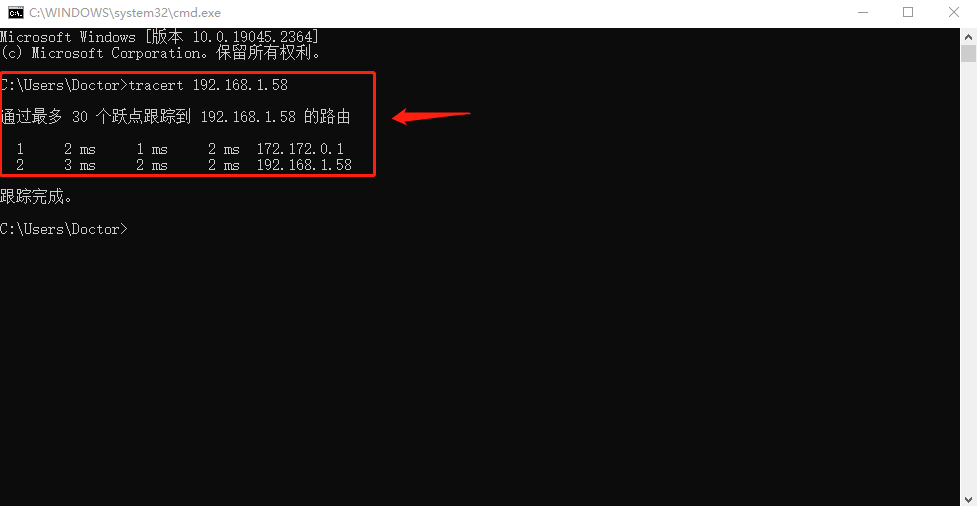
测试是否成功
键盘按 Win+R 输入 cmd 调出命令行终端
输入 tracert 192.168.1.58,前提是服务端有这个 IP 地址,按需修改
如果流量走了虚拟网卡,说明部署成功

本文链接:
/archives/wireguard
版权声明:
本站所有文章除特别声明外,均采用 CC BY-NC-SA 4.0 许可协议。转载请注明来自
Linux 小白鼠!
觉得文章不错,打赏一点吧,1分也是爱~
打赏
 微信
微信
 支付宝
支付宝
 微信
微信
 支付宝
支付宝